by Nichol Chase: Backbends are beautiful, heart-opening yoga poses that many of us would love to add to our yoga practice…
But backbending can be a bit intimidating and many of us are unsure how to safely begin a backbending practice.
No need to feel discouraged! This article will give you the tools you need to better understand a few key beginner backbending poses and how to practice them safely.
Backbends are great for strengthening and energizing the body. These poses help keep our spines healthy, and also stretch the hip flexors, chest and shoulders. The amazing release felt when you practice these heart-opening yoga poses can completely change your yoga practice.
We spend most of our day in some form of a forward fold (think hunching over a computer, or spending hours in poor posture), so it’s no surprise that our bodies often respond to backbending with resistance, tension and even fear.
Backbends are great for strengthening and energizing the body
That’s why it’s important to proceed mindfully and slowly when we ask our bodies to begin a new practice like this. Above all, it is so important to take the time to prep your mind and body.
First, It Is Important to Prepare Your Body for Safe Backbends:
I know from personal experience how important it is to practice backbends mindfully. Backbends came naturally to me and as a result, I went too far too fast. In the pursuit of deeper backbends, I ignored my body’s warning signals, pushed past my discomfort, and ultimately injured myself.
After I recovered from my injury, I began practicing a progression of backbending poses to learn how to align my body properly. The sequence I practiced helped me focus on activating the areas of my body needed for healthy backbends and to gradually prepare my spine for deeper backbends.
Before diving into a backbending practice, allow yourself the time to get in touch with your body. Sit in a comfortable position and take 3 – 5 deep breaths to notice how you are feeling, and check in with your body.
If your backbending practice becomes intense, simply take a Childs Pose and return to this deep breath and check back in with your body to determine if you are at your capacity, or if you should proceed. When it comes to backbends, it’s all about mindfulness and honoring where our bodies are at that day.
Read on to learn 5 great beginner backbending yoga poses, along with tips for proper alignment and muscle engagement for each pose.
Now You’re Ready to Practice These 5 Beginner Backbends:
The safest and easiest backbending poses to help you find the proper alignment and muscular engagement are poses in a prone position (belly on the mat).
Prone backbends are beneficial because you are working against gravity to create the backbend shape – which makes it easier to focus on your alignment.
1. Salabhasana (Locust Pose)

Salabhasana is a great beginner backbend that allows the yogi to focus on the muscles needed to create the backbend in their spine. With consistent practice, Salabhasana will tone the muscles along your spine to help you prepare for a deeper backbending practice.
Let’s try it:
- Lie on your belly on your yoga mat
- Place your legs hip width distance
- Keep your kneecaps and toes facing the floor to keep your legs from turning out at your hips. This alignment also prevents the backbend from “dumping” into your lumbar spine and SI joint
- Lengthen your tailbone toward your feet and press your pubic bone into the floor
- Interlace your fingers behind your back (or use a yoga strap or yoga block if clasping your hands is too intense) and lift your chest off the floor
- Slide your shoulder blades down your back to stabilize your shoulder girdle and open your chest
- Stretch your arms as straight as you can as you broaden your chest and collarbones
- Continue to lengthen the body as you lift your legs and chest higher
- Hold for a few breaths, then slowly lower your torso and legs to the floor and release the hand bind
How to find proper muscle engagement:
- Engage the muscles of your back that run along your spine to lift your chest higher
- Gently activate (don’t squeeze) your gluteal muscles to lift your legs higher
- Hamstrings and calves are engaged and lengthened
- Activate and peel your abdomen from the floor
- Engage your quadriceps to lift your legs higher
2. Dhanurasana (Bow Pose)

Dhanurasana is an amazing yoga pose to help you open your chest and heart chakra and to allow your body to explore a gentle backbend. Dhanurasana can also be an energizing backbend that stretches the entire front of the body including the shoulders and hip flexors.
Let’s try it:
- Lie on your belly on your yoga mat
- Bend your knees and bring your feet toward your hips
- Keep your thighs, knees and shins hip-width distance
- Lengthen your tailbone toward your feet and press your pubic bone into the floor
- Clasp the outer blades of your feet or ankles with your hands
- Lift the fronts of your shoulders and slide your shoulder blades down your back (again, to stabilize your shoulder girdle and open the front of your chest)
- Firmly press your feet into your hands to lift your thighs and chest higher
- Hold for a few deep breaths, then slowly release your hands, legs and torso to the mat
How to find proper muscle engagement:
- Actively kick your feet into your hands to activate your gluteal muscles, hamstrings and calves to lift your legs higher
- Activate your abdomen by knitting your ribcage in and lifting from your pubic bone to your sternum with engagement
- Continue to firmly kick your feet into your hands to engage your quadriceps and hips to lift your legs higher
Once you build a strong foundation in your prone backbending practice, you can begin to increase the challenge by bending backward with gravity and practice standing backbends.
For many of us, this can bring up fear because you can’t see where you’re going, so be sure to remain mindful of your alignment and engagement.
3. Ustrasana (Camel Pose)

Ustrasana is a great yoga pose to explore when you’re ready to progress in your backbending practice.
Ustrasana is also a great pose to use yoga blocks – simply place the blocks (on whichever height works best for you) on either side of your ankles and place your hands on them instead of reaching for your ankles.
Let’s try it:
- Begin kneeling on the floor (if you need extra padding under your knees, place a blanket under your shins or fold your yoga mat beneath them)
- Make sure your thighs, knees and shins are hip-width distance apart
- Your toes can be tucked or flat on the mat – just be sure you press your feet into the mat
- Place your hands on your lower back to invite your tailbone down and your spine to lengthen
- Draw your shoulder blades down your back
- Shift your hips slightly forward and lift your chest toward the ceiling as you bend back
- Continue to hug your elbows closer together to broaden your collarbones
- Remain here, or if it’s available, reach one hand down to your heels. If you are able, you have the option to reach the second hand to your heels for the full expression
- Hold for a few breaths, then place your hands on your low back, and engage your abdominals to help you come out of the pose and protect your back. Be sure to lift your head slowly and rest for a moment when you come out
How to find proper muscle engagement:
- Press down lightly through the tops of your feet to activate your calves and your hamstrings
- Lengthen your spine and lift your chest before you bend to engage your upper back muscles
- Engage your quadriceps for stability
- Knit your ribcage in and lift your chest up before you bend to activate your abdominal muscles
The next two backbends are upward facing, which invite you to use your limbs to create the backbend shape. This makes it more difficult to keep the proper alignment and muscular engagement in your body, so be sure to remain mindful while you’re in these poses.
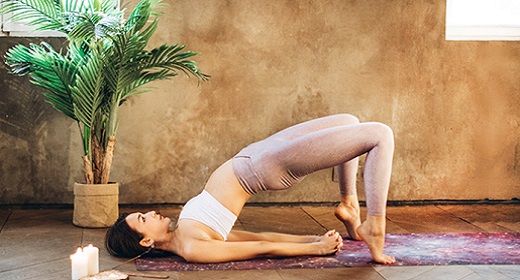
4. Setu Bandha Sarvangasana (Bridge Pose)

Setu Bandha Sarvangasana is a great beginner backbending pose to help you focus on correct alignment and engagement when practicing belly-up backbending poses. It is a more gentle backbend that can progress into a deeper bend as your backbending practice gets stronger.
Let’s try it:
- Begin on your back with your hands by your sides (palms facing down), your knees bent and the soles of your feet on the floor
- Make sure your heels are close enough to your hips so your knees stack on top of your heels. Your feet should be hip-width distance and parallel to one another
- Lightly squeeze your inner thighs toward the midline to keep your legs from turning outward
- Press into your feet and lift your hips
- For a deeper bend, interlace your fingers beneath you and press your fist into the mat to help lift your hips higher
- Hold for a few breaths, then release the hand bind and slowly lower down one vertebrae at a time to the mat
How to find proper muscle engagement:
- Press down through your heels to engage your calves, hamstrings and gluteal muscles
- Press down into the balls of your feet to engage the muscles on the fronts of your shins (tibialis) and your quadriceps
- Engage your core by lightly knitting your ribcage in and down to help protect your low back
- Keep pressing your hips toward the ceiling, lightly hug your inner thighs inward, and press down through the inner edges of your feet to keep your legs from turning out
5. Urdhva Dhanurasana (Upward Facing Bow Pose)

Similar to Dhanurasana, Urdhva Dhanurasana provides a great front body stretch and back strengthener. The biggest difference is the strength needed to press the body off the floor into your full Urdhva Dhanurasana, which makes it more challenging to remain focused on proper alignment.
Let’s try it:
- Begin on your back with your arms along your sides, your knees bent, and the soles of your feet on the floor
- Bring your heels under your knees and make sure your feet are hip-width distance and parallel to one another
- Lightly hug your thighs toward one another so your legs don’t turn out
- Then place your hands under your shoulders with your fingers pointing toward your hips
- Press into your feet and hands to lift your body off the mat, and then place the crown of your head on the mat
- Press down through your hands and straighten your arms, keeping your shoulder blades strongly on your back
- Continue to lengthen the spine and open your chest
- Hold for a few breaths, then slowly release the crown of the head back to the mat, and lower your body down one vertebrae at a time
How to find proper muscle engagement:
- Press down through your heels to engage your calves, hamstrings and gluteal muscles
- Press down through your hands to fully straighten your arms and lift your chest up to engage the muscles on your back and arms
- Continue to press your hips toward the ceiling, lightly hug your inner thighs inward and press down through the inner edges of your feet to keep your legs from turning out
Practicing Backbends Safely: The Takeaway
Enjoy the journey of your new backbending practice and remember these tips to help you stay safe: keep your legs hip distance, your pelvis neutral, your shoulders stable and move in and out of the pose with control.
Continue to treat your body with love and be mindful of your alignment while backbending – there is never a need to push your body past its limit. Take it one breath, one day, and one backbend at a time.


