by Tonya Wetzel: Yoga straps are simple tools that offer a lot of benefits. And if you’re wondering how to use a yoga strap, you’ll likely find a lot of different answers…
We often think about using straps in beginner classes to help modify poses, but straps aren’t just used to make poses more accessible to new yogis (although that is one great benefit!).
You can also use yoga straps to:
- Improve posture or alignment in a pose
- Advance your practice
- Give you the feeling of a hands-on assist
- Help to reach a bind
- Lengthen and deepen in some poses
- Modify poses to fit your body
- Find deeper opening
- Assist in finding an incredible stretch
- . . . and so much more!
Here’s How to Use a Yoga Strap in 6 Common Poses:
If you’re an intermediate or advanced practitioner it’s time to dust off your yoga strap and try these poses.
1. Supine Bound Angle Pose (Supta Baddha Konasana)

This is one of my all-time favorite juicy stretches that uses a strap. You’ll feel like you have a hands-on assist once you get into this pose.
Let’s try it:
- Connect the ends of your yoga strap to make a large loop
- From Staff Pose (Dandasana) bend your knees and bring your feet in toward your groin
- Allow your knees to fall open to either side
- Support your knees with blocks if you like
- Place the strap under the pinky toe side of your feet, over your ankles, and then slide it over your shoulders and down to your lower back
- Pull the strap tight so that there is mild yet comfortable tension between your feet and back
- Use your hands and elbows to slowly lay your back down on your mat
- Once on your back, slowly inch your feet away from your groin
- You should feel a nice groin and hip opening and some lengthening in your lower spine from the looped strap
- Enjoy three to five minutes before gently working your way out of the pose
2. Reclined Big Toe Pose (Supta Padangusthasana)

In this version, you use the yoga strap as a cradle for your head to give you a hamstring stretch and some neck relief.
Let’s try it:
- Start with a long-looped strap and lay down on your back
- Shimmy your hips and shoulders to make sure your spine is long and straight on the mat
- Tuck your right leg into your chest, and then lengthen it up toward the ceiling
- Your left leg can remain long, or your can bend it and put your left foot on the ground
- Loop one end of the strap just under the ball of your right foot
- Loop the other end of the strap over your head so that it cradles the back of your skull
- Adjust the length of your strap so that your head feels supported and your hamstrings get a nice stretch
- Release tension in your head and neck and allow the strap to support you
- You may feel a little buoyancy in your head as you relax into the stretch and your hamstrings open more
- Stay in this pose for up to two minutes before switching sides
Gain Full-Body Flexibility Using These 3 Key Yoga Props (Photo Tutorial)
3. Half Frog (Ardha Bhekasana)

Using a yoga strap with Half Frog allows you to square off your shoulders and find some natural alignment through your spine.
Let’s try it:
- Make a medium-sized loop with your strap
- Start in Sphinx Pose (Salamba Bhujangasana) with your elbows directly under your shoulders and the tops of your feet on the mat
- Bend your right leg, bringing your heel toward your glute
- With your right hand, reach back and loop the strap around your right ankle
- Loop the other end of the strap around your right arm at your shoulder
- Tighten the strap as much as needed so that you get a nice quad stretch
- Square off your shoulders and return your right forearm to the ground
- Hold for one to three minutes before releasing and trying on the left side
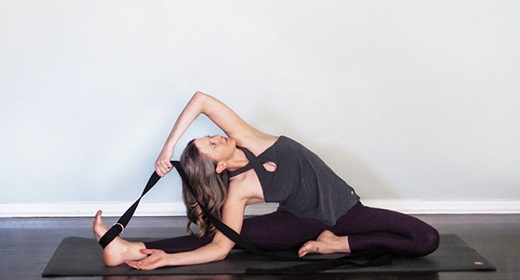
4. Revolved Head-to-Knee Pose (Parivrtta Janu Sirsasana)

Using a yoga strap around your foot in this pose allows for a bit more twist, chest opening, and an incredible side body stretch.
Let’s try it:
- Start in Bound Angle Pose (Baddha Konasana)
- Make a small loop in your strap and place it over your right foot
- Extend your right leg out to the side, leaving the tail of your strap handy
- Externally rotate your right leg at your hip so your knee and foot are pointing up toward the ceiling
- Leave your left leg as it is with your foot close to your groin
- Keeping both your hips grounded, inhale and lengthen your spine
- Exhale and lean over your extended right leg
- Place your right forearm on the ground on the inside of your right leg for support
- Grab the strap with your left hand
- Leading with your elbow, lift and twist your chest open toward the ceiling, bringing your arm overhead
- Savor the amazing side body, shoulder, and hamstring stretch for up to two minutes
- Return to Bound Angle Pose, switch the strap to your left foot, and enjoy the other side
5. Dancer Pose (Natarajasana)

If you’re working toward King Dancer, a yoga strap is a great tool to support you. It helps you find more opening and increases your backbend in the pose.
Want to rock King Pigeon Pose too? Flip Your Grip and Master King Pigeon Pose With These 8 Prep Poses
Let’s try it:
- Start in Mountain Pose (Tadasana) holding both ends of the strap in your right hand
- Shift your weight into your left foot and bend your right leg, lifting your foot behind you
- Loop the strap around your right foot and “floint” your foot to keep the strap from popping off
- Bring both ends of the strap up over your right shoulder
- Set your gaze (drishti) and find your balance before moving on
- Grab both ends of the strap with both hands, and lift your arms overhead
- Point your elbows up toward the sky as you walk your hands down the strap closer to your feet
- Stabilize your body by pressing into all four corners of your standing foot, lifting and lengthening your chest and spine, and kicking firmly into the strap
- Hold for three to eight breaths and gently release and remove your strap before switching sides
6. Extended Hand-to-Big Toe Pose (Utthita Hasta Padangusthasana)

Using a yoga strap for Extended Hand-to-Big Toe Pose helps to create a bit more space to reach your foot. This helps to prevent straining, rounding your spine, or losing your shoulder alignment.
Let’s try it:
- Start in Mountain Pose (Tadasana) holding one end of the strap in each hand
- Shift your weight into your left foot and ground through the floor
- Lift your right leg up, bending at your knee
- Place the strap under the ball of your right foot
- Gather both ends of the strap in your right hand at about shin height
- Bring your left hand to rest on your waist
- Extend your right leg straight forward and slide your hand down the strap as much as needed
- Even out your hips by pulling your right femur into your hip socket
- Use your core to stabilize and set a gaze on a point in front of you at head height
- Lengthen through your spine, lift your chest, and pull your right shoulder back to make sure it is in line with your left
- Hold for five breaths
- Bend your knee, remove the strap, and return to Mountain Pose before switching sides


