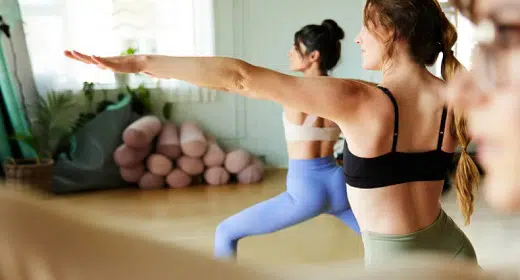
by Danielle Hildreth, CPT: Ready to unleash your inner warrior, yoga heads? Us too. That’s why we’re going to help you channel the Xena in your soul and spill the yoga beans on Vīrabhadrasana, or Warrior Pose…
Warrior, known in Sanskrit as Vīrabhadrasana, is a series of yoga poses that embodies the mythic warrior Vīrabhadra (according to the Vedic teachings).
It’s iconic for a reason. It’s a core posture — a lunging, standing asana that can help you build strength in your legs, spine, and torso.
According to yogic teachings, Warrior I is super important for developing your alignment, practicing deep and mindful breathing, and developing flexibility in your shoulders and back.
Warrior I is the OG pose, but there are several Warrior poses. You’ll find that many of the advanced variations also become regular features of your routines on your yoga journey, including Reverse Warrior (Viparita Virabhadrasana) and Humble Warrior (Baddha Virabhadrasana).
Oo-rah! Here’s all you need to know about Warrior Pose, from how to achieve perfect form to its benefits and tips on tightening up your technique.
Warrior I looks simple on the surface. But don’t be fooled — as with all yoga poses, there’s more to this than meets the eye.
Warrior I Pose step-by-step
- Start in Mountain Pose (standing with intent, basically), facing the wide edge of your mat. Step your left foot about 4 feet away, toward the left edge of your mat — far enough that you have to stretch your left leg.
- Turn left foot inward 45–60 degrees, and turn right foot 90 degrees to point toward the front of the mat. Try to keep your heels aligned along your center.
- Placing hands on your hips, bend your front (right) knee. Allow your extended back leg to stretch out, hinging on the toes of your left foot until the sole is at a 45ish-degree angle with the back edge of the mat.
- Keep your center of balance around your hips and pelvis, aligning your center with an imaginary line between your heels.
- Raise your arms so they’re pointing straight upward at a 90-degree angle to the floor. Tighten your shoulders, drawing them into your spine.
- Hold, feeling the lift from your arms running up your back leg and through your belly, chest, and arms and then out through your pinky. Be sure to keep your head neutral and facing forward.
- When you’re ready, straighten your front leg and turn your feet back toward the wide edge of the mat with your arms to your sides.
You don’t have to start from Mountain Pose if you’re entering Warrior I as part of a flow. For example, if you’re in Downward-Facing Dog, you can start with your feet at the back of the mat and lunge your right foot forward. Just make sure your feet are correctly positioned in step 2 to give you stability.
Bringing Warrior Pose into your yoga routine can potentially yield some super benefits. In addition to being a great foundational pose from which you can build up to more advanced postures, it carries some science-backed positives by merit of being, well, yoga.
According to a 2017 research review, practicing yoga can improve muscle strength, flexibility, and balance in adults. Warrior Pose targets your shoulders, arms, back, and legs. So, if you’re embarking on your yoga adventures to strengthen these areas, Warrior Pose is a good choice.
Science also supports yoga’s potential for relieving aches and pains. This includes chronic pelvic pain in women (and it could be really useful, since 4 to 16 percent of women experience some form of regular pelvic pain).
Warrior Pose stretches your shoulders, neck, back, belly, groin, legs, and arms. If you’re yoga-ing to target pain in these regions, Vīrabhadrasana may be one to add to your routine.
You can also enjoy the many scientifically backed benefits of practicing yoga in general.
For one thing, it may improve your sleep quality, according to a 2020 study that assessed the impact of yogic meditation on the snooze quality of healthcare pros.
Research also suggests yoga can help improve general mental health and emotional well-being — according to a 2020 study, it may be helping folks emotionally unpack and deal with the effects of the COVID-19 pandemic.
Many of yoga’s benefits are still hugely under-researched, but it *could* help these aspects of your life.
You should always seek the advice of a healthcare professional before a yoga instructor when it comes to aches, stiffness, and mental health. But going with a beginner’s pose like Warrior I is a way to dip your pinky toe into the practice with minimal risk and see if you feel the benefits.
So you’ve got Warrior Pose I down, huh? Nice! Well, the “Fast and Furious” movies don’t stop at the first installment either, and for good reason. Here are the next stages you can implement to advance your Vīrabhadrasana-based yoga routines.
Warrior II
Once you’ve perfected your Warrior Pose I, the logical next step is (drumroll, please) Warrior Pose II. Warrior Pose II is veeeery similar, but you’re going to keep your arms stretched out by your sides. Here’s how you do it:
- Start at the top of your mat with your feet slightly apart.
- Step your right foot back into a lunge, so your front knee is bent, your back leg is straight, and your back heel is lifted off the floor.
- Slowly rotate your back foot to a 90-degree angle while placing the sole of your foot on the mat. Your toes should now be facing the wide edge of your mat.
- Keeping your front knee bent and pressing it toward the pinky side of your front foot, extend arms out to your sides and gaze forward toward the top of your mat.
Reverse/Peaceful Warrior
Reverse Warrior (Viparita Virabhadrasana) is sometimes called Peaceful Warrior. If your yoga classes involve Vinyasa flow, you’ll probably know this pose because it’s part of the Dancing Warrior sequence (which goes Warrior I, Warrior II, Reverse Warrior).
This is a great Warrior Pose variation if you want to put in a little extra work on your quads, neck, hips, and groin. Here’s how you get into it:
- Starting in Mountain Pose, turn to your left and step your feet 4–5 feet apart.
- Turn your right foot out about 90 degrees, so it’s pointing toward the front of the mat, and your left foot out a little. Remember to keep those heels aligned.
- Raise your arms to shoulder height, so they’re parallel with the floor. Keep your palms facing down.
- Bend your front (right) knee, lunging into Warrior II.
- From Warrior II, drop your back (left) hand to the back of your left thigh. Lift your right arm up, stretching your fingertips toward the ceiling. Your right biceps should be tickling your right ear if you’ve got the angle right.
- Tilt your head up so you’re looking toward your raised fingertips. Allow your hips to sink into the position, stretching through your waist and arms. Your shoulders should be relaxed, and your back hand will slide down your left leg as you go.
- Hold for as long as possible. When you’re done, go back into Warrior Pose II, then Mountain. Repeat (but mirrored) for the other side.
Humble Warrior
Humble Warrior Pose, aka Baddha Virabhadrasana (aka Devotional Warrior, Bound Warrior, or the Silver Surfer pose), is a great next step forward from Warrior I. Yoga has heavy ties to spirituality and mental wellness. According to yogic beliefs, Humble Warrior promotes introspection and self-awareness.
How much you choose to engage with the spiritual elements of yoga is your call. What we can tell you, though, is that Humble Warrior is a great way to add some extra stretch to your lower back, upper back, hips, and shoulders.
Here’s how to fill your warrior with humblitude:
- Start in Warrior Pose I, with right leg forward (you can mirror it if you want to start with the left leg — your call).
- Bring front foot 1–2 steps out to the right to keep your groin open and support your knee.
- With hands behind your back, interlace your fingers. Inhale.
- While exhaling, gently bring your upper body forward until your head reaches your front knee (or all the way to the mat, depending on how flexible you’re feeling).
- Your arms should be straight up in the air behind you, bending backward at the shoulder.
- Reverse and mirror for your other side.
Warrior Pose seems simple on the surface, but achieving perfect form on even those most basic yoga poses isn’t as easy as it appears.
If you’ve been trying in vain to feel the full benefits of Warrior Pose in your routine, here are a few common mistakes and tips that may help.
Bending your front knee too far forward
Your front knee should be bent at a roughly 90-degree angle. Bending too far forward can damage your knees and the ligaments in your legs.
If you’re focusing the tension in Warrior Pose on your knee rather than your thighs, abdominals, or glutes, readjust until you feel that stretch in all the right places.
Turning your back heel out too far
Knowing how to position your feet and heels during Warrior Pose can be tricky. It seems like a small step, but it’s super important. If you’ve misaligned your back heel, your hips can’t rotate to fully support your weight. This can lead to a big ouch.
Make sure you’re not turning your back heel too far out. Turn it 45–60 degrees toward your center when you lift it from the mat during your Warrior Pose lunging.
Overarching your lower back
The main bend in Warrior Pose, as far as the spine is concerned, should happen in the upper back. A common rookie mistake is to put all your bend in the base of your spine.
When executing any sort of backbend in a Warrior Pose, think about lifting your chest up toward the ceiling before you begin to arch your back. This will keep your lower back out of the bend.
The support in Warrior Pose comes from your hips and core, which lets your upper back bend. Keep your lower back as straight as possible.
Keeping your shoulders tense but your arms slack
The final touch-up is to make sure your arms and shoulders have the right relationship. Remember: arms tense, shoulders slack.
This can feel counterintuitive at first since your arms are either up in the air or out by your sides in many variations of Warrior Pose.
While Warrior Pose summons your shoulder strength, the stability should come from your arms. Your shoulders should be relaxed enough for your weight and balance to shift as you sink into and hold your various Warrior positions.
Vīrabhadrasana I, or Warrior Pose I, is the most basic of a series of standing lunge yoga postures.
Warrior I is a great entry-level yoga posture that builds balance, stability, and muscle strength in your core, hips, legs, arms, and upper back. Your whole body will be engaged, but these are the bits of you that Warrior Pose focuses on specifically.
Yoga comes with a range of science-backed health benefits, including improved muscle strength, fewer aches and pains, and a host of mental health pluses. Warrior Pose is a great early step in your yoga journey, with a bunch of trickier variations to hike up the benefits you experience.


