by Tonya Wetzel: You may have heard yoga teachers say things like “twist to release toxins from your body” or “wring out your organs.” But what’s really happening in yoga twists, and how should we safely practice yoga twists sequences?
When twisting in yoga poses, we move the top and bottom halves of our body in different directions by rotating the mid-section of our spine.
Twists help increase spinal range of motion, release tension in the muscles that support our spine, aid in digestion, and can help relieve some types of back pain.
As with many things that are good for you, they can also be challenging, and twisting poses are no exception. Twisting requires you stretch the muscles and connective tissues along the spine and rib cage.
What Happens Anatomically in Yoga Twists?
When twisting, you create space between the vertebrae and ribs. Yogis with tighter upper bodies and/or psoas muscles may find yoga twists sequences difficult due to limited range of motion.
Your individual ribs are connected to each other by intercostal muscles. These are the muscles that allow your rib cage to expand and contract when breathing. These muscles are also lengthened in twists.
This makes breathing in twists difficult because we’re already stretching these tissues via the twist, which leaves less room to expand for breathing. The good news is these muscles can be lengthened over time. So breathing in yoga twists will get easier with consistent practice.
Beyond this, our spine has three major sections:
- Cervical (neck)
- Thoracic (middle back)
- Lumbar (lower back)
We naturally twist through our neck, as these vertebrae are designed for maximum mobility. Our middle and lower spine are designed for weight bearing, and therefore don’t rotate as easily.
When twisting in most yoga poses, you’ll want to stabilize your lower spine, hips, and core while focusing the twisting action through your middle spine. Then you can add to the twist with your neck and gaze.
Use This Yoga Twists Sequence to Rejuvenate Your Spine
Ready to twist your way to a healthier spine? Follow this yoga sequence and untangle your back.
1. Easy Supine Twist (Supta Matsyendrasana)

Let’s try it:
- Start by laying on your back
- Lift and bend your right leg until your knee is stacked over your hip
- Leave your left leg long on the mat
- Grab your right knee with your left hand
- Extend your right arm to the side, keeping it in line with your shoulder
- On an exhale, guide your right knee over to the left
- Place it on a block or the floor
- Your right hip will lift off the mat
- Place you right shoulder back on the mat if it lifted during the twist
- Pick your head up and turn it on its axis to the right
- Hold the pose and breathe for at least five breaths
- To exit the pose, lift your head and bring it back to center
- Use the muscles in your core to help you bring your right leg back up and your right hip to the ground
- Extend your right leg back to the ground and repeat on the left side
2. Twisting Down Dog (Parivrtta Adho Mukha Svanasana)

Let’s try it:
- Start in Plank Pose (Phalakasana), with your fingers spread wide, hands aligned directly under your shoulders, and feet hip-width apart
- Lift your hips up and back until you form an upside down “V”
- Lengthen through your spine by reaching your pelvis up toward the ceiling
- Press through your arms and shoulders like you’re trying to press the mat away from you
- Shift your weight into your right hand and come onto your left fingertips
- Once you have your balance, reach your left hand back and grab the outside of your right ankle
- Rotate your torso to look under your right armpit
- Work to keep your hips level and twist through your thoracic spine by rotating your left ribs to the right
- If you feel unstable, you may want to shorten your Down Dog stance before rotating
- Hold for five to eight breaths
- Release the twist, bring your left hand back to the mat, and repeat on the other side
3. Plank Twist Knee-to-Elbow (Phalakasana Variation)

Let’s try it:
- Start in Down Dog (Adho Mukha Svanasana)
- Lift your right leg long behind you, finding a 3-Legged Dog
- Keep your hips square and your leg straight
- Inhale and lengthen though your right heel
- On your exhale, shift forward, bringing your shoulders over your wrists and pull your right knee toward your left elbow
- Your shoulders and arms will remain neutral like in Plank Pose, the twist will happen through your middle and lower spine and hips
- Press into your hands and broaden across your shoulders to make a bit of extra room for the twist
- Inhale and return to 3-Legged Dog
- Complete three to five rounds of Knee-to-Elbow, moving in and out of the pose on your inhales and exhales
- After your last round, hold your knee to your opposite elbow for three solid breaths to practice active stability
- Return to Down Dog, and repeat on the left side
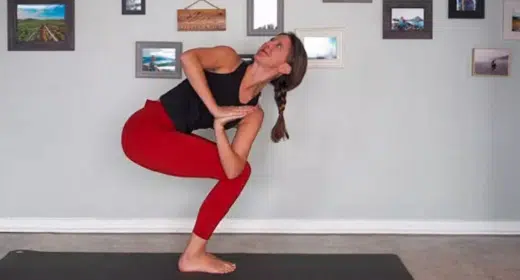
4. Revolved Chair (Parivrtta Utkatasana)

Let’s try it:
- Start in Mountain Pose (Tadasana)
- Bend your knees and sit back like you’re sitting into a chair
- Sweep your arms overhead with your palms facing each other
- Reach up with your outer arms and pull down through your inner arms as you broaden across your collar bones
- Shift your knees back if needed so that you can see your toes
- Keep your tailbone pointing down toward the ground to maintain the natural curves in your spine
- Bring your palms together over your heart center
- Inhale and lengthen through your spine
- Keeping your hips level, exhale and twist to the right, bringing your outer left arm to your outer right thigh
- Press your arm into your leg to rotate through your waist, chest, and neck
- Try to bring your breastbone up toward your hands
- Be careful not to strain or rotate so far that you can’t take a full breath
- Hold for five breaths, unwind through center, and repeat on the other side
5. Revolved Lunge (Parivrtta Anjaneyasana)

Let’s try it:
-
- From Down Dog (Adho Mukha Svanasana), take a large step forward with your right foot, placing it between your hands
- Keep your back left leg long, and press through the ball of your left foot
- Slide your left hand a little closer to your right foot
- Activate your core and lengthen through your spine
- Keeping your hips neutral, rotate your chest to the sky, starting at about your belly button, then through your ribs, shoulders, and finishing with your neck
- Stack your right hand over your left, trying to create a straight line from your grounded left hand to your right fingertips
- Press firmly into your grounded left hand to help lift your chest and prevent sagging in your shoulders
- Hold for at least five breaths, unwind your twist, and step back through Down Dog before moving onto the left side6.
- Revolved Triangle (Parivrtta Trikonasana)

Let’s try it:
-
-
-
- Start in a standing wide-legged stance facing the long edge of your mat
- Externally rotate your right leg at your hip socket until your toes are facing the front end of your mat
- Internally rotate your back leg slightly until your foot lands around a 45-degree angle
- Extend your arms out to a “T” shape
- Press down into all four corners of your feet as you isometrically engage the muscles in your legs
- Inhale and lengthen through your spine
- Exhale and pinwheel your hands around, bringing your left hand to the ground or a block on the pinkie toe side of your right foot
- Shift your weight around slightly between your legs until you find level hips
- Press into your left hand as you lift and lengthen your spine, opening your right shoulder to the sky
- Try to stack your right shoulder over your left without scrunching your spine
- Hold for five breaths
- To come out, pinwheel your arms back up until you are facing the long end of your mat
- Repeat on the left side, pivoting to face the back end of the mat
-
-
7. Revolved Pyramid (Parivrtta Parsvottanasana)

Let’s try it:
-
-
-
- Start in Mountain Pose (Tadasana) with your hands on your hips
- Take a short step back with your left leg, landing with your foot at about a 30-degree angle
- Traditional alignment has the heels of your feet in line with each other, but widen your feet to hip-distance apart if needed for more stability
- Inhale and lengthen through your spine like you are trying to lift your ribs off your hips
- Exhale and hinge forward at your hip joint, keeping your back flat and long
- Keep your hands on your hips to make sure they stay level
- Once your chest is parallel to the ground, bring your left hand to the ground or a block roughly in line with your right foot
- Lift through your right shoulder to access the twist
- Extend your right arm up toward the ceiling
- Hold for five breaths, then unwind your twist and return to Mountain Pose before completing the left side
-
-
8. Revolved Half Moon (Parivrtta Ardha Chandrasana)

Let’s try it:
-
-
-
- Start in Warrior 3 (Virabhadrasana 3) on your right leg with both hands on the ground or blocks
- Flex or floint your right foot to activate your muscles and find stability in your floating leg
- Press into your left hand and bring your right hand up to your hip
- Inhale and find some extra length in your spine
- Exhale and twist open to the right
- Use your right hand on your hip to make sure that both hip points stay facing the ground
- Once you find rotation through your torso, extend your right arm up toward the sky
- Lift until your right shoulder is stacked over your left
- Your right leg should remain parallel to the ground
- Hold for five breaths, and don’t worry if you’re a bit wobbly – this pose is hard!
- To exit the pose, unwind your twist, and take a Standing Forward Fold (Uttanasana) between sides
-
-
Realign Your Spine With This Yoga Twists Sequence
Even though yoga twists are full of benefits, they aren’t for everyone. Speak with a doctor before doing intense twists if you are pregnant, have a spinal disc injury, or ongoing GI issues.
To keep twists healthy and helpful, remember to stabilize and lengthen first, and then twist. And don’t forget to breathe for the entire time you’re holding your twist.
It is possible to strain the muscles between your ribs, therefore it’s important to listen to your body when twisting and not push yourself beyond your individual limit.
The goal in twists is to help create a healthy and flexible spine and decompress the vertebrae. There’s no gold stars awarded in yoga for throwing yourself out of alignment just so you can twist around like an owl.
Try this yoga twists sequence carefully and with intention, and after making it part of your regular practice, you’ll feel like you’ve been gifted with a new spine.


