by Hannah Hewitt: Downward Dog or Adho Mukha Svanasana is a classic asana that uses the muscles of upper and lower body…
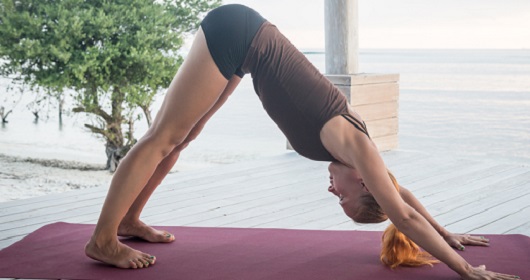
to lift the centre and allow the spine to lengthen, from the base to the crown. It is classified as an inversion (meaning the heart is located above the head).
Benefits of Downward Dog
Builds strength
In the upper and lower body, in particular the hands, wrists, arms, legs and feet. By developing muscles in the feet this posture can prevent flat feet from developing and also restore the arches in the feet. Building strength also builds bone density which in turn can prevent osteoporosis from developing. Relieves back pain and energises the body.
Improves flexibility
This pose stretches all the muscles up the back of the body, including the shoulder muscles, arms and hands, and the muscles of the legs; hamstrings calves and feet muscles.
Boosts circulation
By bringing the head below the heart, gravity helps blood flow more easily to the brain. It can help with regulation of the blood flow, stabilising blood pressure and heart rate.
Calms
The nervous system, relieving; stress, insomnia, headaches, depression and anxiety.
Therapeutic
For high and low blood pressure, digestion, constipation, indigestion, asthma, sciatica, sinusitis, also relieves symptoms of menopause and menstrual discomfort.
Precautions of downward facing dog pose
Carpal Tunnel Syndrome
Or any repetitive strain or injury in the wrist, practice with caution and rest frequently, if needed props can be used to modify the distribution of weight into the hands, for example supporting the heel of the hands. Otherwise modify the posture, where the forearms can rest onto the floor, instead of the hands.
High blood pressure
Do not stay too long in this posture, and support the head with a block, if needed.
Diarrhoea (recent or current)
Advisable not to practice.
Pregnancy (particularly late stages)
Advisable not to practice.
How to do Downward Dog
Beginning on hands and knees, place the hands underneath the shoulders and release them into the floor, but without pushing, at the same time draw up through the fingers so that you feel a connection through to the shoulder girdle, and a spreading and widening from the breastbone through to the shoulder blades.
With the knees placed directly underneath the hip joints, keep the tops of the feet in contact with the floor, initially, allow the feet to widen on the ground and have a sense of their connection to the hip joint, through the leg. Now gently tuck the toes under so that you are resting on the balls of the feet, preparing to lift.
Inhale and expand the chest and the ribs, feel the lift that the air brings into your body as you allow your spine to arch up, using the lift in the arches of your feet, allow your hips to float up now, bringing the very base of your spine towards the sky. Keep lifting up through your feet from the toes, and keep the connection from your fingers through to your shoulders.
Exhale and release the shoulders outwards, to allow the spine to lengthen forwards towards the ground. Feel the head also connected to the top of the spine, its weight gently pulling the spine towards the ground. Without loosing the lift in the hips, release the heels, so they might move towards the floor.
Tips for Beginners:
Since we are upright beings, primarily using our legs and feet everyday, the muscles of the legs tend to be tight and short, which can make moving into this pose difficult for a beginner, so do some gentle preparatory movements, for example rotating feet and ankles, circling hips and stretching the muscles of the thighs and backs of the legs.
We do not normally use the hands and the wrists to support any of our body weight, so this is certainly an area to be aware of. Warming up the muscles and the joints in the arms and hands are essential, to prevent from strain or discomfort.
The main purpose of this pose is to create a lift of the base of the spine, often refereed to as the tailbone, to allow the spine to lengthen and release. Therefore it is important not to push and force the heels down to the ground and straighten out the legs, as this will cause the hips to drop and the back to round. If needed, keep the knees bent and lift up onto the balls of the feet.
As with the feet, it is also important, not to flatten the hands into the floor and press down into the heel of the hand, as this will put all the pressure into the wrists, and stop the opening in the shoulders. What we want to achieve is an even spreading throughout the hand, and a lift up from the fingers into the centre of the palm, so that there is a fluidity that spreads right up into the forearms and eventually up into the shoulders.
As with any other yoga posture, the importance of practising, is not to reach what we think of as the perfect Downward Dog and to hold it as long as possible, but to experience and try to be fully aware of the whole body, which encompasses every element of preparation, to the small details in the posture itself and finally to the resting and absorption of its effects.
Variations:
Keeping the sense of lightness in the hips, release one foot from the floor, feel the leg fly up towards the sky, reach the entire leg behind you towards the sky along the same plane as that your spine is moving, yet in the opposite direction. Feel the great length this gives your spine as your stretch through the entire body, swap legs and repeat.
Things to notice:
How does the effect of gravity impact your senses? sight? smell? touch? How about observations inside your body? How do your muscles feel, your bones, your organs even? Then see if you can shift your observations towards the outside, how you perceive the world? How does your environment seem from your place in this posture?
Release:
Release the hips to bring the knees to the ground, bring the tops of the feet onto the floor and rest back, the torso onto the thighs in child pose, finally resting the forehead on the floor, arms laid alongside the body, palms facing upwards.

