
by Mireya Semeles; With the growing number of articles and studies published around the benefits of yoga, this ancient Indian discipline is gaining more and more followers in the West…
Even doctors are prescribing regular attendance to yoga classes as therapy for specific bodily conditions and injuries. The benefits of yoga go beyond the physical and it is now encouraged to treat psychological illnesses like depression, anxiety and eating disorders. A recent study showed that yogic practices enhance muscular strength and body flexibility, promote and improve respiratory and cardiovascular function, promote recovery from and treatment of addiction, reduce stress, anxiety, depression, and chronic pain, improve sleep patterns, and enhance overall well-being and quality of life.
Yoga Poses for Beginners
There is however an opposing phenomena discouraging people to attend yoga studios: the distorted media around poses. Lean, beautifully toned bodies in yoga asanas far from reach to the vast majority, feeding the false belief that yoga should look a specific way to be “right”. There is no right or wrong in yoga, and it is definitely accessible to everybody interested in taking the first step in their passionate journey towards the self.
Below is a simple series composed by 10 poses accessible for beginners, which can be modified with time as the body transforms.
Starting poses
1. Savasana (Corpse pose)
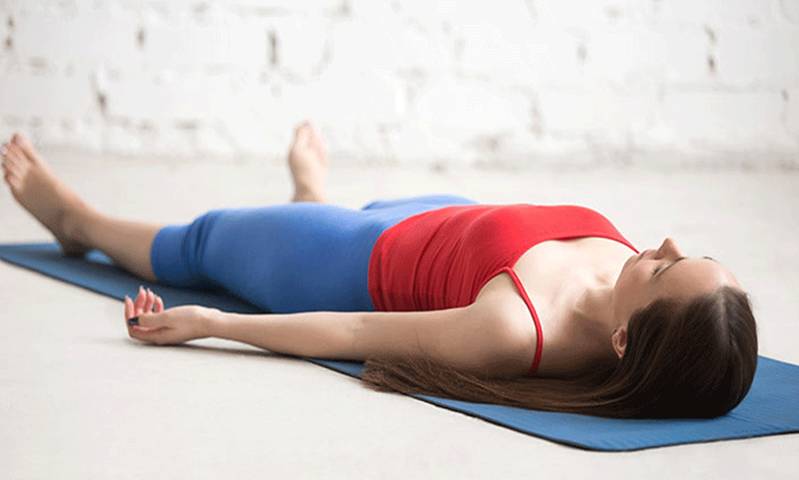
How: the body is placed in a neutral position, lying down on a yoga mat. Arms alongside the body, with palms facing up. Shoulders are away from the ears and resting comfortably on the floor. Legs are separated as wide as the mat with feet falling to the sides. The whole body is released and relaxed – from the toes to the crown of the head. The yoga practitioner is encouraged to feel how the body melts onto the floor, to notice how even the tongue, eyelids and skin release. Savasana offers the opportunity to breathe normally and notice the movement through the body of every inhale and exhale.
Why: It allows to connect to the self, to come back home and become an observer to one’s thoughts. Laying on the mat for a few minutes allows the body and mind to relax, releasing any stress carried. Beginners should not be discouraged if they find themselves unable to linger to the thoughts that appear in this pose, Savasana might look easy from the outside, but it is a challenging pose to hold for a few minutes. A constant practice will help to enjoy the benefits of this asana.
2. Chakravakasana (Cat-cow)

Image source bostonmagazine.com
How: Chakravakasana is practised standing on hands and knees. The wrists are in line with the shoulders and the knees in line with the hips and separated not wider than hip-distance. The alignment in this pose is important to protect the joints. A blanket can be placed underneath the knees if there is any feeling of discomfort. The spine is in a neutral position maintaining the neck long, as if pulling the crown of the head away from the tailbone. The base of the pose are the hands and knees and so fingers must be spread widely to avoid weight hanging on the lower back. With a solid base, the body is free to move. With every inhale the head and tailbone draw up, allowing the chest to open and expand (cow). With every exhale, the head and tailbone draw downward, arching the spine (cat). This dynamic movement can be maintained for five to 10 breaths.
Why: Chakravakasana is a full massage for the spine. Moving the spine this way creates space in between each and every vertebra, regenerating the bone marrow and strengthening the back muscles. The flexibility of the spine is increased. The pose is specially recommended to those spending long periods of time standing up, as being in all fours allows the spine to take a break from keeping the body standing against gravity.
3. Adho Mukha Svanasana (Downward-facing dog)
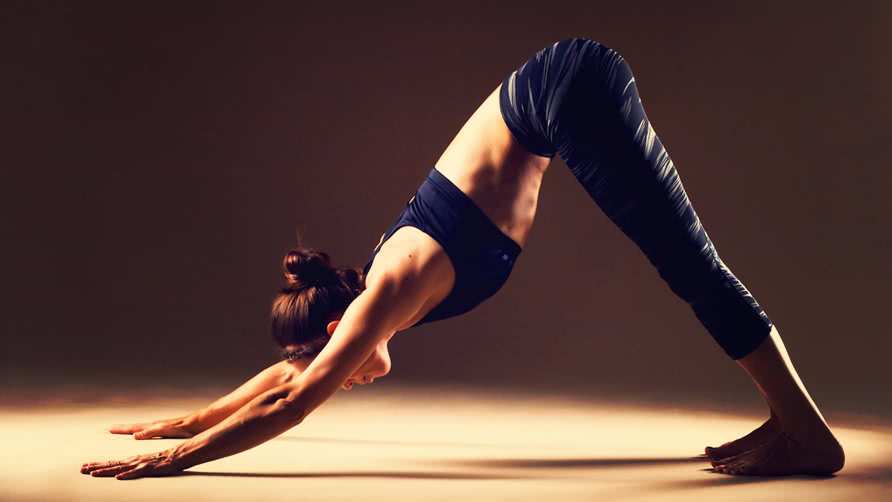
Image Source youqueen.com
How: There are several ways to enter Adho Mukha Svanasana. An accessible way to do so is to transition from Chakravakasana (cat-cow), which would have allowed to construct the firm base with the hands that is so important for a correct downward-facing dog as well as establishing a comfortable distance between hands and feet. The action of having all fingers spread wide, allows the upper arms to rotate outwards whilst keeping the forearms rotated in. The knees are then lifted from the floor and the hips lift up to the sky and away from the body. To allow the spine to lengthen, shoulders are consciously pulled away from the wrists and knees can be kept bent. This pose does not seek to touch the floor with the heels, but rather to create an inverted ‘V’ with the body that allows the whole back to stretch and decompress. Letting the head fall will allow for the neck to relax.
Why: Adho Mukha Svanasana does wonders to the back of the body by stretching the shoulders, spine, hamstrings, calves, arms and ankles whilst strengthening the upper part of the body. When the body is positioned in the inverted ‘V’ shape, blood circulation is stimulated, energising the whole system whilst calming the mind. It is a great pose to come back to oneself and check what places feel tight and need more attention and care.
Standing poses
4. Virabhadrasana I (Warrior I)

Image Source www.yoga213.com.au/
How: Virabhadrasana I is well constructed from the previous pose, Adho Mukha Svanasana, by bringing one foot forward next to that same side’s hand. The hands can be used if the foot doesn’t make it the first time, The alignment in this pose is important to prevent injuries. The knee of the front leg needs to be kept in line with the ankle forming a 90 degree angle. To protect the lower back, the back leg needs to be kept very active. The position of the back foot is slightly turned, so that the heel is on to the floor with the toes turned out about 45 degrees from the it. As a reference, the middle part of the back foot should be in line with the front foot. When the feet are forming a solid base, the top part of the body can be raised, with the hips squared towards the front of the mat – putting the hands on the hips will help raise awareness of any mis-alignment in the hips. With steady feet and active legs, the top part of the body is free to move upward. Even the arms can be raised towards the sky. The head can follow the arms, but with care that the neck is not tensed. The chest can expand. It’s ideal to maintain this pose for 5 to ten breaths and then hold it on the other side.
Why: To maintain a stable Virbhadrasana I requires balance. It therefore enhances focus and concentration. If done consistently it tones legs, arms and increases flexibility of the shoulders. Giving room in the pose for the chest to open presents a great opportunity to face life outside the mat with an open heart.
5. Virbhadrasana II (Warrior II)

Image Source cnyhealingarts.com
How: Virbhadrasana II differs from Virbhadrasana I in that the arms are opened to the sides and the hips open to face the side of the mat. The gaze is directed beyond the middle finger of the front hand, whilst keeping the shoulders directly above the hips. In order to keep the neck relaxed. There is a tendency to tense the shoulders in this pose and so they have to be consciously pulled away from the ears. The upper body is in centred in relation to the rest of the body and both hands pull in opposite directions, allowing the upper back to stretch, To maintain this pose, a lot of strength is required in the legs and arms. To allow for this, triceps need to remain engaged to support the arms, and the quadriceps to support the legs. It’s ideal to maintain this pose for 5 to ten breaths and then hold it on the other side.
Why: Similar to Virbhadrasana I, Virbhadrasana I strengthens legs and arms, especially if it is maintained for a few breaths. It also helps build core strength by contracting the abdominal organs. Core strength is key to the the practice of more advanced yoga poses.
6. Tadasana (Mountain Pose)
Image Source northshore.org
How: standing at the front of the mat, with feet together or hip-width apart, the toes are spread as wide as possible. It is important to create a good base in this pose, grounding every part of the feet on the floor. The best way to describe the grounding of the feet is to imagine it as upside down triangle: with one line going from the little toe to the big toe and the other two from the heel to each one of them (big and little toe). The feet need to be very active, and so do the legs. This ensures that the knees are held and protected. Arms fall alongside the body and are also strong and active, allowing the side of the body to lengthen. Shoulders are pulled away from the ears, creating space in the neck and allowing it to lengthen as if the crown of the heat was being pulled up by a string. It is good to hold this pose for at least 30 seconds to 1 minute, breathing easily.
Why: Tadasana is the foundation of all standing poses. It offers the opportunity to create a strong base that will allow the yoga practitioner to construct every other standing asana. In addition to this, Tadasana also allows to improve the posture outside the mat by keeping the body grounded building strength in the legs and ankles.
Seated poses
7. Dandasana (Staff pose)

Image Source yoga-enfants-adultes.com/
How: Dandasana is performed seated on the floor or mat with both legs placed together and extended in front. In the same manner as Tadasana can be seen as the mother of all standing poses, Dandasana is the base upon which all seated poses are constructed. The objective here is to sit in a comfortably manner that allows the back to lengthen. The legs remain very active, with all ten toes facing up, to protect the lower back. If the activity of the legs is lost, then the weight of the body is commonly beared by the lower back, causing stress and tension. ‘Combing’ the flesh backward to allow for sitting on the sit bones, elongates the spine and creates space between the vertebrae. Because this is not easily maintained, Dandasana, is often practiced seated on the tip of a folded blanket or a block. The two opposite forces working in this pose are the crown of the head reaching towards the sky whilst the tailbone is directed downward.
Why: Dandasa promotes a good seating posture. For those who spend long periods of time sitting in front of a computer or who tend to easily crouch when seated, it helps to develop a posture consciousness by providing a reference towards which to work.
8. Baddha Konasana (Cobbler’s pose)

Image Source augustyoga.com
How: Starting from Dandasana, the legs are folded inward, holding the soles of the feet together with both hands and placing them as close to the body as it is possible without compromising the back. The position of the back that was described in Dandasana is maintained in Baddha Konasana, with the same opposite forces working. The objective in this pose is to maintain the knees below the pelvis, even if the feet need to remain further away from the groin to allow for this. The same supports for sitting that were used in Dandasana can be used here. With every inhale the spine is lengthen and the exhale allows to intensify the pose. Although a natural tendency is to flatter the legs in this pose, this can be damaging for the hips and should be avoided.
Why: The release on the hips is immediately noticed when the pose is constructed. The position in which the legs are placed allows to open the groins and hips. A lot of emotions are held in this area, which cause it to tense and can often lead to movement problems. By practising Baddha Konasana with regularity and holding it for at least five deep breaths, releases all this tension and emotions. It is not rare to feel rather emotional after releasing the hips in yoga.
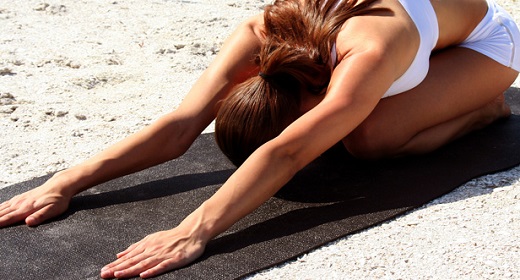
9. Balasana (Child’s Pose)
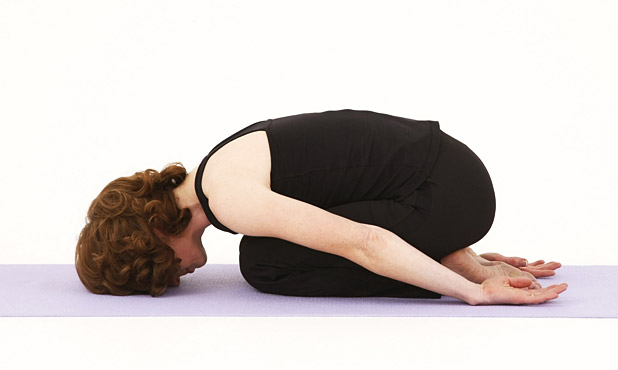
Image Source womenpla.net
How: Standing on all fours (hands and knees) the hips are moved backwards until they rest on the heels. Knees can be wider apart than hip-distance and on top of a blanket if there is any pain or discomfort when placing them on the mat. Big toes touch. The stomach lies between the thighs and the forehead gently rests on the mat. This allows the back to lengthen. The arms also rest on the mat and can be either stretching forwards with the palms down or alongside the thighs with the palms facing upwards. Balasana is a resting pose, and as such, the practitioner should select the variation with which they feel more comfortable. This pose is safe to hold for as much time as desired, connecting back with the breathing and relaxing a little more with every exhale.
Why: Balasana stretches and relaxes the whole spine and lower back, helping to release any back pain. It is also a great pose to turn the gaze inward helping to tune in with the breath and serve as a meditative vehicle.
Final pose
10. Savasana (Corpse pose)
Finishing lying in Savasana for five minutes or longer allows the body to take in all of the goodness from the practice. To increase the comfort in this final relaxation, a blanket or bolster can be placed under the knees. Body temperature falls quite dramatically in Savasana, it is therefore important to cover the body with extra clothes and a blanket.
With time and constant practice, the poses in this routine can be modified and changed to better suit the development of the practitioner.