by Hwansan Sunim: We’ve been hearing that the traditional cross-legged meditation posture is too difficult for beginners…

This is part one of a special two-part series on how to practice Son meditation while sitting in a chair. Today we’ll learn correct meditation posture, a cleansing exercise, and proper breathing technique. Here we go:
Choosing the Right Chair
1. Please choose a chair that is quite sturdy and stable. Avoid one with wheels.
2. Ideally, the seat of the chair should not be contoured for your buttocks but flat and hard with a thin layer of cushioning. It should feel like you’re sitting on top of a thick wool blanket that’s been spread over a hard wooden platform. This is to provide optimal support and stability.
3. The height of the seat should be adjusted so that when you lay your feet flat on the floor, your knees bend at a 90-degree angle.
MEDITATION TIP: If you can’t get a chair like this, do with what you’ve got. Just bear in mind that the two most important factors are stability and the height of the seat. Be careful to make sure every square inch of the bottoms of your feet can make contact with the floor.
Correct Posture: Provides mental and physical stability
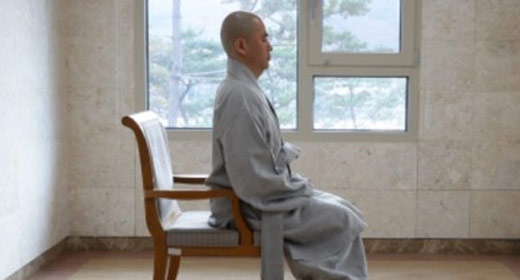
1. Sit with your buttocks on the center of the seat. Your back should be straight and not touching the back of the chair.
2. Your feet should rest flat on the floor, parallel to one another and about shoulders’ width apart.
3. Your ankles should bend at about 90 degrees so that your shins are roughly perpendicular to the floor.
4. Likewise, your knees should bend at about 90 degrees so that your thighs are roughly parallel to the floor.
5. Your spine should be held perfectly upright without leaning in any direction or slouching.
6. All in all, there are now three right angles in your body: when viewed from the side, the right angle between your back and your thighs, the one between your thighs and your shins, and finally the one between your shins and your feet.
7. Tuck in your chin slightly so that the crown of your head rises toward the ceiling and you achieve maximum vertical extension of your spine.
8. Do not close your eyes. Keep them open and look straight ahead. With your chin tucked in, your gaze should naturally fall on the floor about 15 feet or 5 meters in front of you.
9. Do not stare at any one point or object. Instead, look forward with an expressionless “soft gaze” so that everything in your field of vision appears with the same level of focus.
10. The best thing is to sit in front of a perfectly blank white wall. If you don’t have one, try to sit in front of something bland and not distracting.
11. Gently place the tip of your tongue against the roof of your mouth just behind your upper row of teeth. This folded tongue position may feel odd, but it activates stabilizing muscles in your neck and is considered to facilitate the flow of qi or energy through your body.
12. Keep your mouth closed and do not clench your teeth.
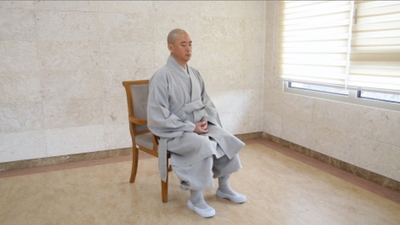
13. Place the edge of your right hand with the palm up, against the center of your abdomen, just above your pubic bone. Let it rest there naturally with an open palm.
14. Place your left hand, again with the palm up, directly on top of your right palm.
15. Join your thumb tips together gently so that the line of your connected thumbs creates an elegant rainbow arc. Now you’re ready to meditate.
Preparation Breathing: Cleanses and calms the mind and body
1. Breathe in through your nose as deeply as you can so that you completely fill your chest.
2. Hold your breath until it becomes mildly uncomfortable.
3. Breathe out through your mouth with the longest possible exhalation so that you completely empty your lungs. Imagine that you’re squeezing out your lungs in the way that you’d squeeze out every last drop of water from a big wet towel.
4. Repeat this cycle of nasal inhalation-hold-oral exhalation three times.
5. With each big outbreath, imagine that you’re blowing out all of the accumulated toxins, waste products, tension, worry, stress, annoyances and distractions in your mind and body.
6. This is a wonderfully simple way to refresh your mind and body. I recommend that you do it both before and after you enter into any kind of stressful situation.
7. After completing three cycles of preparation breathing, enter directly into diaphragmatic breathing.
MEDITATION TIP: This breathing exercise is very helpful when we’re overcome by negative emotion. Think of emotion as a wave that has a beginning, middle and end. When you’re upset, just keep doing this breathing as many times as needed until the emotional wave has finally passed through you. Preparation breathing is helpful precisely because it’s so easy.
Diaphragmatic Breath-Counting Meditation
In Son meditation we use a method of breathing called diaphragmatic breathing, which sometimes is also called “belly breathing” and “abdominal breathing.” This is considered the most efficient and effective breathing method for the human body. Before we can begin to meditate we need to get used to it. Here we present, in one package, instructions for diaphragmatic breathing and a breath-counting meditation exercise traditionally used to train for Son meditation.
1. Inhale through your nose in a long, gentle inbreath that takes roughly 2-3 seconds.
2. As you inhale, gently push out your lower belly as if the inhaled air is filling it.
3. Imagine that the air is going all the way down to a point about 2.5 inches (about 6 cm) below your navel. When viewed from the side, this point is in the center of your body, between your lower belly and your sacrum or lower back. This point is called in Chinese “dantien” (energy field) and is considered to be the central repository of the vital energy called qi that is said to circulate like blood throughout the body.
4. As you inhale and direct the air toward your dantien, it should feel like a small balloon inside your abdomen is slowly filling and expanding with air.
5. When your belly feels about 80 percent full, pause for about 2-3 seconds.
6. Then, exhale for a long outbreath, even longer than your inbreath, and suck in your lower belly as you do so. Exhalation time should be roughly 3-4 seconds.
7. Breathe out with the feeling that the air is being blown out from your dantien. As you exhale, the balloon in your lower belly sags and collapses, drawing your navel toward your spine.
8. At the end of your outbreath, count, “One.”
9. Then, once again inhale, pause, and exhale. At the end of your exhalation, count, “Two.”
10. Continue in this manner until you reach 10.
11. Then, on your next breath, count, “Nine.”
12. Proceed in this manner and count back down to 1.
13. For as long as you wish to practice, count from 1 to 10, then back down to 1 again, then back up to 10 again, and so forth.
14. BUT there’s a catch to this. Think of this breathing exercise as a kind of game. If at any moment in your breath count you hesitate for even a second, you must begin at 1 again.
15. Initially, your head may feel full of distracting thoughts and you may find it difficult to count up to 10. But as you learn to relax your body and your mind clears, you’ll find it easier to go up and down the count at will.
16. When you can count up to 10 and back down again easily, increase the count to 20. Then, go up to 30, and so forth. Think of this as strength-training for your brain. The higher the count that you can handle, the greater the mental strength you’ve cultivated. It is said that if you can count up to 100 and back down again at any time you choose, your mental concentration and stability are so powerful that you can achieve any goal that you set for yourself.
MEDITATION TIP: Coordinating the movement of your lower belly with your breathing can be tricky for beginners. Here’s a good way to practice: Lie flat on your back with your knees raised and your feet flat on the floor. Put a small pillow under your head and a heavy book on your abdomen. Now practice diaphragmatic breathing. If the book rises and descends with your inbreath and outbreath, then you’ll know you’re doing it right. Also, the weight of the book demands more effort from the muscles in your abdomen and so you become aware of which muscles to use and how to use them.
MEDITATION TIP: Don’t do diaphragmatic breathing until at least two hours after a heavy meal. Also, don’t try to do this breathing during strenuous activity.
You want your diaphragmatic breathing to be long, slow, and gentle, but keep it in your comfort zone. Just remember that the inbreath and pause are of the same duration and the outbreath is a little longer. Breathing like this should never feel strenuous and you should never feel out of breath.
Diaphragmatic Breathing-Counting Meditation is traditionally used to build the mental skill of concentration and the physical skill of self-willed relaxation in novice meditation monks. Without this training, there’s no way that they could handle the average daily schedule of 8-10 hours of meditation used in Son Buddhist meditation halls.
This exercise can also be an extremely helpful way for modern lay beginners to ease into their own personal meditation practice. For the next few days try to set aside at least 10 minutes a day to work on this posture and breathing method.
Practice consistently and over time your breathing cycle will lengthen and you’ll experience for yourself the surprising levels of peace and well-being that correct breathing technique can provide. Your breath will flow through you like silk, like flowing stream water, and you will discover for yourself that joy is something you can create just by breathing.
So let’s start practicing today. You’ll be pleasantly surprised at how fast you improve and how better you feel. And you’ll be prepared for part two when we begin formal Son meditation practice. Take care.
Palms together,
Hwansan Sunim


