


Have you ever attended a beginner’s yoga class and felt that you were in way over your head, not to mention your body?
Well, you are not alone…
One person’s “beginner’s yoga class” can be another’s fantasy “advanced class.”
There are many reasons for this, which I will explain in a moment, but I want you to be sure to stay tuned to try out some truly beginner’s yoga poses below!
What is appropriate for your body and mind as a beginning yoga student depends on many factors. Here are some of them:
- Age
- Weight
- Current physical condition
- Previous levels of fitness
- Natural or learned coordination
- Previous exposure to yoga
- Previous exposure to something like dance or gymnastics
- Your constitution – some like it fast, others slow and some in between
- General Health
- Natural body limits or tendencies
- Willingness to try new things
- Willingness to not be perfect
- History of injuries or illness
- The style and type of yoga
As you can see there are MANY factors involved in what might make for a good beginning yoga class for any one individual. In fact, yoga originally was taught one-to-one. The ancient yoga masters knew that there was not a one size fits all yoga practice.
What to look for in a Beginner’s Yoga Class
When looking for a beginner’s yoga class, ask about the demographics of the class — age range, type of person (athletes, moms etc.), style, room temperature and experience and training of the teacher. The irony is that most new yoga teachers start by teaching yoga for beginner’s classes when in fact beginners are the most challenging group of students to teach!
Get Ready!
Below are some yoga poses and practices that I think are Truly Beginner’s Yoga. Some are traditional yoga practices and some are building blocks towards traditional yoga practices. I think you will love the simplicity of these practices and I invite your feedback.
You may also want to review the “6 Tips for Yoga Beginners” which gives advice on mindset and expectations for beginning a yoga practice. Be sure to practice the affirmations included below which are based on Ananda Yoga(R) Affirmations for Higher Awareness as they will enhance your practice and help you deepen your experience of the yoga postures beyond the physical.
Your 5 Truly Beginner’s Standing Yoga Practices to Love Individually or As a Sequence.
Please read all of the instructions first before attempting the practices for your safety and enjoyment. And as always, practice safely and do only what is right for your body today.
1. Deep Belly Breathing
It’s always a good call to begin your yoga practice, or your day, event, meeting — just about any beginning — with Deep Belly Breathing.
How To:
- Stand tall and relaxed.
- Place your hands on your belly. As you inhale through your nose, feel your belly move forward. As you exhale, also through your nose, feel your belly gently contract.
- Continue repeating as you find a rhythm that feels comfortable for you. After some time, you can let your hands rest comfortably at your sides and continue with the breathing.
- Practice at least 6 rounds or as long as it feels comfortable.
Cautions: Don’t get frustrated if it doesn’t feel natural at first. Try just taking what feels like relaxing breaths for you. If it still feels awkward, skip it for today. Try again another day or find a local yoga teacher to help you.
Benefits: Reduces stress, which slows down the heart rate, increases digestion, improves the immune function, and reduces inflammation, plus centers and focuses you to prepare for the rest of your yoga practice. Improves mood.
Tip: Feel your feet press gently into the ground and the top of your head lift up toward the sky. Good relaxed postured makes deep breathing easier.
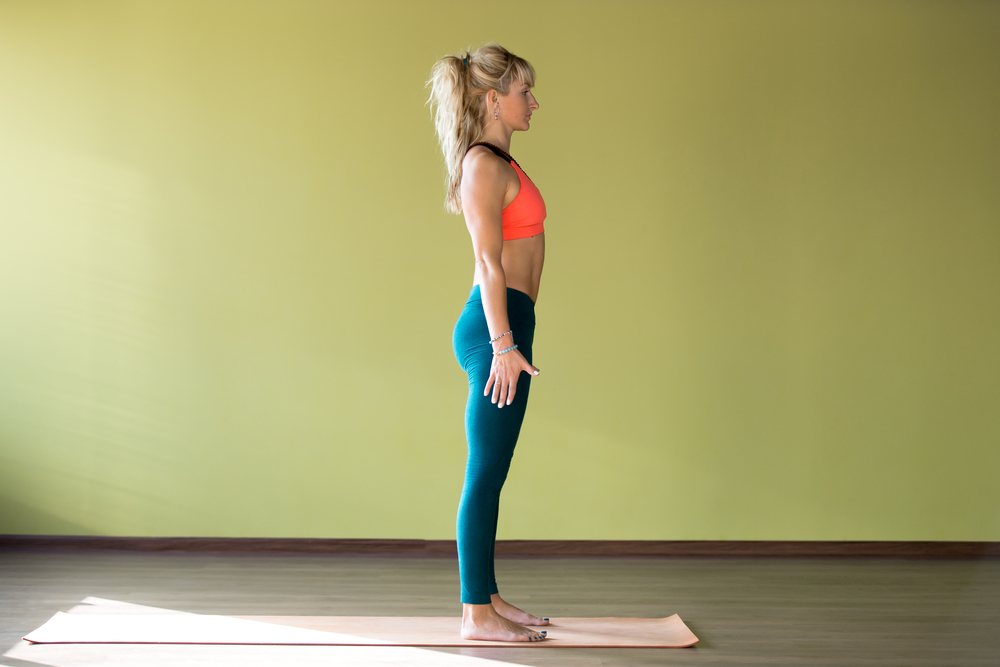
2. Yoga Standing Pose
Traditionally called Tadasana, this pose grounds and centers you and is your first check in for posture and alignment.
How To:
- Stand with feet comfortably close together. Depending on your body shape they may or may not touch at the edges of the balls of the feet. Be comfortable.
- Have your toes point straight ahead. Keep your weight evenly distributed on your feet. Keep your knees soft not locked. Relax your tailbone down.
- Keep your sternum/breast bone lifted. Relax your shoulders. Lengthen the back of your neck and try to keep your head comfortably in place with your ears lining up with your shoulders. Look forward or slightly upward with your eyes.
- Stand tall and relaxed.
- Click Here for special video instructions from Ceci, Host & Co-Founder of Zenward.
Breathing: Breathe deeply and comfortably.
Cautions: Be near a wall or sturdy chair if this pose challenges your balance. Keep knees soft so that they don’t lock or hyper-extend. If you tend to have a sway back, then lift up a little with your front core (belly) muscles to allow the pelvis to move back to a neutral position as you allow your tailbone to relax downward to help take the sway out of your lower back. On the other hand don’t overcompensate and tuck the pelvis. Try to find it’s neutral, natural place.
Benefits: Helps to improve posture and breathing. Helps prevent back pain. Helps get you in a good mood!
Tip: Feel your feet press firmly into the ground and the top of your head lift up toward the sky. Smile!
Affirmation – Repeat 3 times: “I stand awake and ready!”
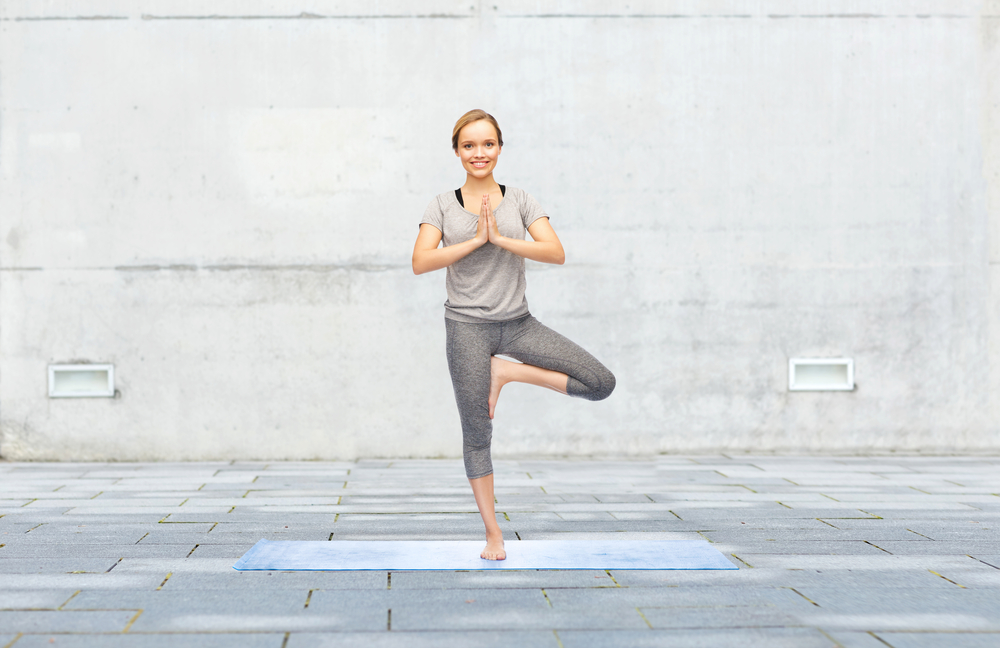
3. Easy Tree
Please note: If your mind is wandering crazily, this pose will be more challenging! On the other hand, as you practice you will find your mind becoming more calm and focused.
How To:
- Start in Yoga Standing Pose. Stand near a wall or chair to help with balance if needed.
- Turn your left foot slightly out to the side.
- Place your right foot on to your left leg. It can be low near the floor or up higher on the leg. Just don’t press into your knee (be above or below it).
- Place your hands either on a chair or palms together in front of your chest. Hands can stay there or you can bring them over head. Keep your shoulders relaxed.
- Hold for a few seconds working your way up to 30-60 seconds over time.
- Come back to Yoga Standing and take a few deep breaths feeling your balance on two feet.
- Then repeat on the other side.
Variation: You can keep the ball of your foot on the floor and only lift your heel to the opposite leg. You can stand sideways to a wall and keep one hand touching the wall and lift the other arm up overhead. When you switch legs turn so you are touching the wall with your other hand. You can also stand with your back to the wall almost touching it so if you loose your balance you just lean back and the wall is there to support you.
Breathing: Breathe deeply and smoothly.
Cautions: Be sure you have a chair or wall nearby if needed for balance so that you will not fall. Don’t lock or hyperextend your knee of the standing leg (if you are concerned about your knees, find a local yoga teacher to help you with this).
Benefits: Improves physical balance and mental calmness. Helps with posture. Increases leg strength and gently improves core strength. Helps induce feeling calm and centered.
Tip: Don’t lean into the hip on your standing leg. Instead feel that you are lifting your body up and off of your hip and that you are getting taller.
Affirmation: Repeat 3 times: “I am calm, I am poised.”
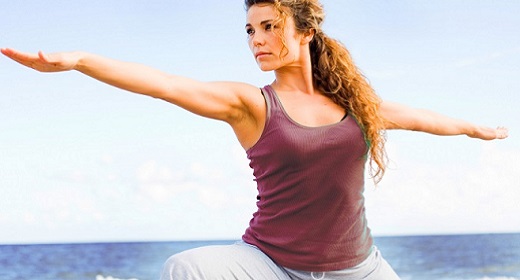
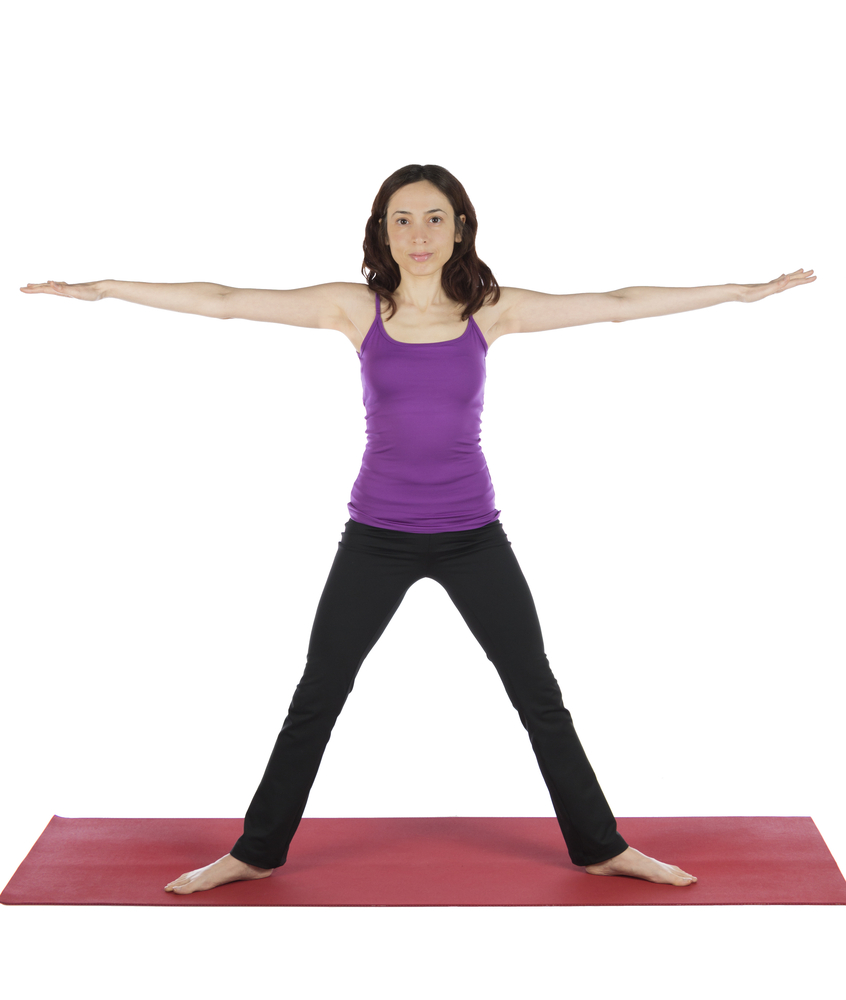
4. Star Pose
This is a building block pose to help you learn the basics of alignment for other yoga standing poses. If you do this full of energy as directed this seemingly simple pose can energize and strengthen your body.
How To:
- Step your feet about 2 – 3 feet apart depending on your height and comfort.
- Turn the feet out a little and be sure that the center of your knees can point in the same direction as your feet to keep them safe.
- Extend your arms out to the side bringing them parallel to the ground.
- Imagine turning on your inner light so that you can shine like the brightest star! Press your feet firmly into the ground feeling your legs strong as you also contract your thigh muscles which should lift your knee caps up.
- Feel your tail bone reaching straight down with the energy of your legs.
- Feel or imagine that your torso is lifting up out of your hip joints creating space there as you imagine the top of your head lifting skyward!
- Allow your shoulders to relax down as you energetically reach your arms in opposite directions as far as they can go.
- At first, hold for 10-30 seconds. Work up to holding for 60 seconds.
Variation: Listen to your body. If your arms need to be lower or stance more narrow, then do what you need to do. It’s more important that you work on the dynamics of the pose — reaching up with the trunk of the body, out with the arms and pressing down with the legs.
Breathing: Breathe deeply and smoothly. If you want to stay a little longer in this pose, then you may want to start emphasizing your exhalation with the Blowing Breath and begin to blow out of your mouth with your exhalation and inhale through your nose.
Cautions: If finding balance is an issue for you, stand with your back very close to a wall or have a sturdy chair or kitchen counter top in front of you. Be easy on your joints. Don’t hyperextend (lock) your knees or your elbows.
Benefits: Strengthens your legs and arms. Warms up your muscles. Helps improve posture and strengthens postural muscles. Prepares you for more advanced yoga poses. Increases energy and promotes smiling and feelings of joy.
Tip: Press your feet down into the floor as you lift your body up out of the hip joints and smile.
Affirmation – Repeat 3 times: “Energy and joy flood my body cells!”
4. Standing Twist at the Wall
This pose is one of the favorites among my students. Using the wall as support, it takes out some of the issues with tight hips for seated twists and the balance issues with standing twists away from the wall, while still giving a great heart expanding and spinal lengthening experience.
How To:
- Stand with your left side very close to, but not touching a wall.
- Have your left foot forward and your right foot back about 12-18 inches apart.
- Place your hands approximately shoulder width and shoulder height apart (if anything slightly wider apart seems to work best for most people) onto the wall.
- Keeping your pelvis and hips straight ahead, turn your upper body toward the left as you look (or attempt to look) behind you.
- If you feel this in your lower back, you probably have too much weight on your back foot. Bring more weight forward onto your front foot. You also might be over twisting or leaning your body to one side or the other. Adjust your position so you feel the twisting action gently on your upper back and neck and not your lower back.
- Initially, hold for 10 – 30 seconds. Over time try to hold for 30-60 seconds.
- Slowly come out and back to center. Repeat to the other side with your right side of your body close to the wall.
Variations: Chair version — hands can be placed on your desk or tabletop approximately shoulder distance apart with your elbows bent.
Breathing: Breathe deeply and smoothly. As you inhale you can imagine that your spine is lengthening. As you exhale you can feel as though your body is relaxing into the twist.
Cautions: The twist should feel good! Never twist into pain, sharpness, tingling or numbing sensations. Follow the instructions above to keep the lower back feeling happy too.
Benefits: Helps improve posture and strengthens back muscles as it also relieves tension in the back and shoulders, increasing flexibility. Promotes feelings of goodwill and love towards yourself and others.
Tip: Feel that you are lifting your body up and away from your hip joints as you keep your spine tall and relaxed. Focus more on lengthening the spine than on twisting farther.
Affirmation – Repeat 1-3 times while holding the pose and 1-3 times when you come out of the pose: “I radiate love and goodwill to soul-friends everywhere.”

5. Deep Belly Breathing
Ending your yoga sequence is also a good time to breathe deeply. As you might have guessed from the instructions above that any time is a good time, perhaps I should say, essential time, to breathe deeply!
Repeat the instructions above for Deep Belly Breathing.
6. Completion
To get the very most out of your practice, always pause and be in stillness before finishing your yoga practice. You can keep the energy of your yoga practice alive all day and into the night if you continue mentally repeating the affirmations.
Stand tall and relaxed. Choose your favorite affirmation from today’s practice and repeat it 6 or more times. Now you are ready for the rest of your day or night!
Continue repeating your affirmation whenever you can until your next yoga practice session.