by Allie Flavio: Pranayama is the fourth petal of the eight limbed yoga path…
it’s considered to be the bridge of the studies, taking practitioners further and deeper. This limb strategically follows asana, the third petal which focuses on the physical postures. After bending and breathing into various postures, the mind is able to relax and cease the constant chatter of thoughts and to-dos. This is where the real journey of yoga begins. When we are able to find stillness, breathe deeply into all four corners of the body, quiet the mind – then and only then – can we turn inward to find the answers we seek.
Pranayama techniques and exercises are tools to help prepare us for the following limbs on the yoga journey – withdrawal of the senses, concentration, meditation, and bliss. They are also extremely beneficial for the union of mind, body, and spirit, for nourishing and rejuvenating, and for lightening and detoxing.
This limb can be intimidating at first with the fancy names, intricate breathing patterns, and the effects that one can feel. But, if learned from a knowledgeable practitioner, the studies are absolutely fascinating and easy to understand. I highly recommend seeking out a pranayama workshop in your local area or researching free online courses to learn more about this beautiful practice.
For any pranayama techniques, it’s best to follow these simple guidelines:
- Practice at dawn or first thing in the morning
- Practice on an empty stomach or well after eating
- Take in quality air by being selective about your practice space
- Understand the benefits of each breathing technique
- Understand the contraindications for each breathing technique
Pranayama techniques vary from creating heat or cooling the body and energizing or relaxing the mind. To further explain this limb, below are four popular breathing techniques that can be practiced at home, in a yoga studio, or wherever your heart desires! Pay special attention to the benefits & contraindications and notice how quickly energy can be shifted from a simple, mindful pranayama practice.
Dirgha Breath
Overview
This is a long, three part breath; it involves deep breathing both on the inhalation and exhalation. The mouth stays gently closed with all air entering and exiting through the nostrils.
Technique (can be performed laying down or sitting up with a tall spine)
- Gently close the eyes, create length in the spine, roll the shoulders onto the back.
- 1st part – Bring hands to the belly, inhale and expand the belly out, exhale bring bellybutton to spine. Allow the belly to completely fill, diaphragm descends on inhalation and rises on exhalation. This requires length of spine and suppleness of the belly.
- 2nd part – Bring hands to lower ribs, inhale and expand the belly and ribcage, exhale releasing the ribs and bring bellybutton to spine. Allows the intercostal muscles to slide & stretch, massages the surrounding lymph nodes creating immunity. Aids in back pain, asthma, and grief.
- 3rd part – Bring hands to collarbones – inhale and expand belly, ribs, collarbones lift, and shoulders broaden & exhale releasing the breath completely down the body and emptying out completely. This final step must be patient & gentle, not forced. We rarely use our upper chest or upper lobes of the lungs, move slowly and with care.
Suggested practice for Dirgha breath
- 2 -3 minutes is a great starting point or 5 minutes or more for seasoned practitioners
- Can be used in all types of yoga classes, it’s beneficial for everyone.
- Practice at the beginning of a class as a transition from a busy day
- Before or after savasana
- Before meditation as a prep to quiet the mind
Benefits
- Builds up our inner strength and courage
- Gives us control in a situation
- Can settle or stimulate the nervous system
- Aids in digestion – bowel movements, menstrual cramps
- Boosts immunity
- Helps with grief
- Builds heat, focus, and concentration
Contraindications
- Recent surgery
- If pregnant or menstruating, practice a gentle version of this breath
Nadi Shodhana – Channel cleansing / Alternate nostril breathing
Overview
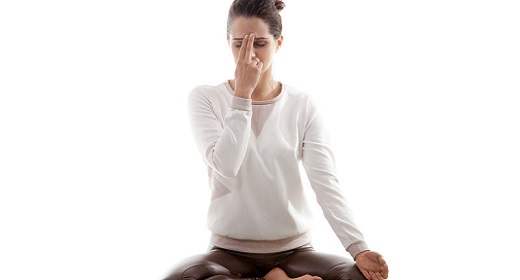
This is an alternate nostril breathing technique that can be used to calm or energize the mind. It can be practiced with the assistance of a hand mudra or hands free – both will produce the same effects.
Technique
always begin and end on the left nostril or left side. The left represents our feminine side which is nourishing, calming, cooling – it’s controlled by the moon.
- For the mudra, use the right hand and make a peace symbol, then drop the two peace fingers, raise the ring and pinky fingers.
- Bring the right hand in the mudra to the nostrils and gently place the thumb on the right nostril – the ring finger will be used for the left nostril.
- Using the thumb, close off the right nostril and inhale through the left nostril
- Remove the thumb and close off the left nostril with the ring finger as you exhale through the right
- Inhale through the right nostril and exhale on the left, closing off the opposing side with each breath.
- Continue to alternate from side to side, letting the mind come to a single pointed focus.
- End the breathing technique by exhaling through the left nostril or left side.
Suggested practice for Nadi Shodhana breath
- 2 – 4 minutes suggested, 5 – 10 minutes is great, 15 – 20 minutes is total bliss
- Can be used in all types of yoga classes, it’s beneficial for everyone.
- Practice at the beginning of a class as a transition from a busy day
- Before or after savasana
- Before meditation as a prep to quiet the mind
Benefits
- Reduces stress and settles the nervous system
- Beautiful prep for meditation
- Balances the left and right hemispheres
- Helps with one pointed focus and concentration
- Reduces insomnia
- Can lower blood pressures
- Great for afternoon or evening classes to refresh and nourish the body & mind
Contraindications
- Avoid if experiencing congestion or respiratory infection
- Can be challenging with a deviated septum
Ujjayi – Victorious or Darth Vader Breath
Overview
This is a warming breath that creates an audible sound. It involves the constricting of the back of the throat which creates a noise similar to “Darth Vader” or the action of fogging up a window with the breath. It is commonly used in Ashtanga type classes but has become widely popular in hot yoga and vinyasa flow type classes too.
Technique
(can be layered onto another pranayama practice or with the asana practice)
- To learn the pranayama, bring hand in front of mouth and envision your hand is a window. Like children do, we want to fog the window and draw fun shapes and letters into the window. Exhale onto your hand and pretend to fog the window. Pay special attention the noise that is created.
- Keep the mouth shut and practice creating that same noise inhaling and exhaling out of the nose only, constricting the back of the throat to deepen the volume and intensity.
- Use this breath to move deeper into postures and help with balance and focus throughout the asana practice.
- Create a long smooth inhalation and the same length and sound on the exhalation.
Suggested practice for Ujjayi
- Layer onto the Dirgha breath to create more heat and a deeper connection to the breath.
- Often practiced with counting when used as just a pranayama practice.
- Can be practiced at any time of the day but be mindful of overheating the body.
- Can be used as prep for meditation.
Benefits
- Creates a feeling of being grounded
- Can be settling, smoothing, and soothing for the nervous system
- The sound helps unite body & mind
- Creates heat and warms the body for physical practice
Contraindications
- Be mindful for people with thyroid conditions – can be done gently which acts like a massage to the thyroid but if too aggressive, can cause stress and anxiety.
- Respiratory infections and sore throat
Kappalabhati – Skull Polishing Breath
Overview
This is an energizing breath that is commonly referred to as skull-polishing or skull-shining breath. It is a cleansing breath that will increase emotions such as intense grief, weakness, or anxiety. Or on the contrary, it strengthens the third chakra building courage, power, willfulness, and helps boost the metabolism.
Technique
- This posture is best done seated, either on the sits bones or with the legs tucked under. I recommend sitting on a block to help lengthen the spine and create space in the belly.
- The shoulders stay relaxed throughout the breath while the abdominals stay active.
- All breathing is through the nostrils, mouth stays gently closed.
- The exhalation is active and similar to blowing your nose or blowing a snot rocket like elementary school days. The inhalation is passive; no effort needs to be made here.
- Gently close the eyes, find length in the spine, roll shoulders onto the back, take a deep inhale filling the entire body, then begin actively exhaling for 30 seconds.
- On the exhalation, the abdominal muscles will constrict, feeling bellybutton connect with the spine.
- On the inhalation, the belly will be soft and supple.
Suggested practice for Kapalabhati breath
- Best done on an empty stomach before breakfast.
- Recommend for healthy and seasoned yoga practitioners.
- Practice for 2 -3 rounds, pausing in between, each round being 30 seconds.
- After the final round, find child’s pose or stay seated, allow the energy created to settle into the body.
Benefits
- Cleanses the blood and decongests the lymph nodes
- Helps to boost immunity and the metabolism
- Heats the belly and strengthens the core
- Great for depression, fear, weight gain, foggy thinking, lack of motivation
Contraindications (avoid if any of the below)
Pregnancy, heart conditions, uncontrolled high blood pressure, respiratory infections like emphysema, nervous system conditions, glaucoma, hernia, colitis, IBS, acid indigestion, any recent surgery, menstruation (first few days), high anxiety, and emotional vulnerability


